Friday, February 27, 2015

Drop Watercolor

Hey Y'all!
Today I have a fun colorful watercolor design!
I dunno about all y'all, but I have been in desperate want of color on my nails lately. With the weather and the time of year it is, I feel like it's not quite time for spring, and have been wantin to save my color pop designs, but all the winter mani's are killin me so I thought I'd bring out a fun one today!
I've done a watercolor mani sever times before but the little twist I put on this one made it lots more fun and quicker! I used an eye dropper to pour the polish down the nail! It was far better than my last one where I placed drops on my nail and shook my hand to get them to pour across the nail. This mani without filmin took litterally 10 minutes maybe, which is always great with any manicure let alone a super cool one that looks like it took hours! 


Here's How:
I started with a white base of Salon Perfect "Sugar Cube." It doesn't have to be perfect as I cover it all up in the design.

Then add a coat of top coat to protect the white as this design does include acetone. 

The first color I used is Sephora Formula X "Omni" blue.

You'll need some foil, which I crunched into little bowls, and drop 2 to 3 drops of polish into it.

Then with an eye dropper pour some acetone into the bowl

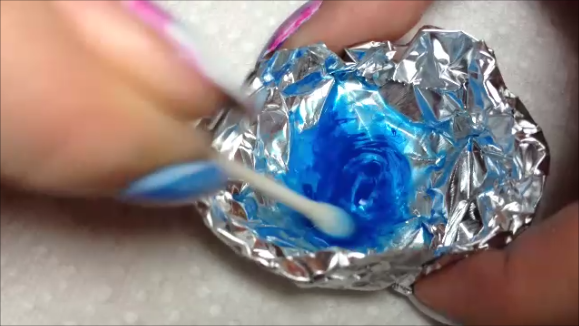
and mix it up with a q tip to make the polish liquidy.

Suck up the polish liquid with the eye dropper

and with your nail pointed at a downward angle pour drops of the polish onto the nail so it runs down.

Next I used Sephora Formula X "Indelible" light purple.

Same process. Add a few drops of polish to the foil bowl and pour some acetone in with the eye dropper.

Mix with the q tip

Suck up the polish in the dropper

And pour down the nail.

The third color is Sephora Formula X "Eureka" hot pink.

A few drops of polish and some acetone into the foil bowl.

Mix

Suck up into eye dropper

Pour down the nail.

The last color is Sephora Formula X "Unmistakable" mint green.

Add a few drops of polish and some acetone into the foil bowl

Mix

Suck up into eye dropper

and pour down nail. This color didn't show up too much but it just gave a nice frosty effect.

Use a small brush and acetone to clean up any excess polish.

Use your favorite top coat to seal it all in. I use Salon Perfect. 
This design also dries really quickly because of how thinned out the polish is and the help of the acetone.

Here's a closeup! I love it!

And that's it! 
Here's the video:


I just have to say real quick that I just got a new light bulb for my ottlite and had forgotten that the lightin would be highly improved so I still used my same method for takin pictures which is why my skin looks darker in 2 of the 3 pics. I'm actually glad there is a difference in them because it showed me just how bad my bulb had gotten gol. 

Anyways I just absolutely love this mani! I always love doin watercolor designs. Each one is always different and unique and just plain cool! I also loved usin the eye dropper, I definitely believe it made things so much quicker and easier. 

If ya get inspired by me use my tag #MagsyInspired on instagram so I can see!

Find me here too:

Have a great Friday!

~Maags


Thursday, February 26, 2015

Salon Perfect Brow Stencil Kit

Hey Y'all!
Today I have a teency bit of makeup for ya! I hope y'all don't mind that I add makeup every now and then. I am definitely not tryin to say in any way that I'm a pro, just that I really love it and have been gettin into it more recently! 
So today I have the Salon Perfect Brow Stencil Kit. It's a 2 color powder with an angled brush and a few stencils to help fill in your brows with ease. 


For me I will say I did not use the stencils as my brows are super full and already shaped, but I did use the powder and really liked it on it's own. I use the lighter one for the front of the brow and the darker one for the ends and they blend perfectly with a spoolie and last all day. 
I did want to use the stencils though for the review so I used one on my mom. She has super thin light eyebrows and has been wantin me to try some brow products on her so I thought this would be not only fun but a great example for what this product can do. 

This is her brow with nothin on it. 

I decided to use the petite arch shape on her. 

Sorry it's a little blurry but basically I just placed it onto her brow so it filled in most of the stencil. 
Then I couldn't take pictures as I was doin em but I just dipped the brush into the lightest color and just started fillin in the whole stencil. Because it's a stencil there was no need to "shape" the brow. I also used the darker color very lightly on the end of her brow. Took less than a minute and then you just remove the stencil and I blended it all with a spoolie. 

This is the finished brow.

This is a comparison of her brow without and with product. You can see it filled them in pretty nicely compared to what we started with. 
I didn't get a pic of both brows finished but she really liked the outcome and is excited to practice it more herself. 

Here's a pic of my brow. I did use the pomade first and then added this powder so it's not by itself, but it does look great none the less.
This pic is filtered but it's a not so close up shot of my brow. You can see I have really full thick brows and didn't feel I would get much use out of the stencils.

Overall I have to say I like this product. Although I won't use the stencils, I can see beginners like my mom and others with light thinned eyebrows might enjoy it. It does work great. It's quick to apply and does last all day, I did test it alone even though I don't have a pic with it, was a bad photo day lets just say gol. I couldn't for the life of me take a good picture that day so we have these instead. I really love the brush that comes with this too! It's a great size especially with the stencil but also without. The angle of it really helps to apply even while shapin your brows on your own. 
Although Salon Perfect did send me these, I'm not bein paid to say good things about this product. I genuinely like them, however I definitely prefer the the pomade ones which I also have a review of posted here on the blog!
These products are exclusively available at Walmart and this kit retails for $4.38.
So that's it today y'all! I hope you found this helpful! 
I truly love Salon Perfect for makeup stuff and nail polish and highly recommend them!

Find Me Here Too:

~Maags


Wednesday, February 25, 2015

Filigree Stamp Tape Mani

Hey Y'all! 
Today I have a recycled mani for ya!
I decided I loved my blue/nude filigree stamp so much more than I thought, so I wanted to keep it on and add to it! I love recyclin mani's, it's fun to add a little somethin extra and see how it changes. 
I just love how this turned out! I haven't done a tape mani in eons! And I used the very last of my tape for this one, so I'll be needin some more soon! Also I haven't used blue in what feels like a long while, and it's makin me realize maybe I really do love it more than I think I do. I have quite a few blue polishes that I didn't quite understand why because I thought I didn't like them, BUT I have decided I actually do. Gol! 

Let's get into how to:
Start with your base color or design. Make sure it's completely dry. I did mine the day before so I knew it was for sure dry. 

Next you'll need to cut pieces of stripin tape and place them on your nail in the design you want. I did each nail different, but this one is a split design on the tip of the nail.

Then paint one side one color. I used Sephora Formula X "Omni" for my first color. 

and the other side another color. I used Nyx Girl "103" dark blue.

Then immediately while it's still wet remove the tape from your nail to reveal the design.

Next use a cleanup brush and some acetone to cleanup any excess paint on the skin.

Use your favorite top coat to seal it all in. I use Salon Perfect. 

And there ya go!
Here's the video:


I am really enjoyin these today. I think I might need to do more blue designs soon! Although we are goin into a green month! gol!

Here I am bloggin this from Kuppa Joy today! Actin like a real big time blogger buahaha! 

See y'all next time!

Find Me Here Too:

~Maags