Monday, June 15, 2015

Recycle Mani Monday: Belle

Hey Y'all!
Recycle Mani Monday here again!
I know this week isn't a traditional recycle mani, as I just had a swatch on, but I had to get rid of my weekend mani. I had had it on since Wednesday night and was sick of it! haha! 
But I still recycled the color so there ya go! 


First of all I love this color! It's Orly Color Blast "Enchanted Rose" from the new belle collection at walgreens! I wanted the whole collection, but mostly just for the names gol! None of the other colors were really that unique and I spose you could say this one isnt either, but to me it is! I absolutely love it! It's such a beautiful hot pink with opaly color shifty shimmer! And so of course I had to do roses on top to go with the name! 

Here's How:
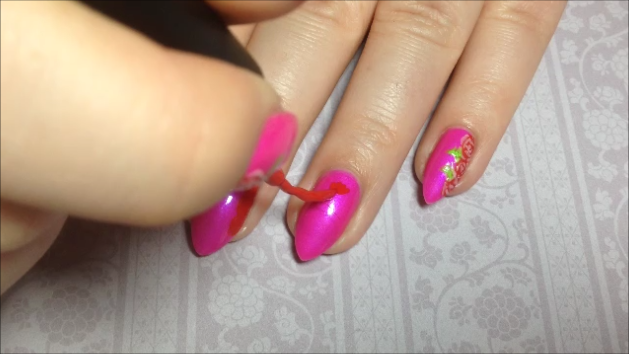
I started by usin a red liner polish to make rough circle shapes down the side of my nail. They don't need to be perfect circles. The liner I used is Salon Perfect "Laser Beam."

They'll look like this.

Then I decided to do a standin rose on the ring finger. I started making small lines at the top of the nail comin in from the sides to meet eachother in the middle. Little swoops kind of. 

It'll look somethin like this. 

Then I used a light pink polish (Salon Perfect "Pocketful of Posies) and a striper brush to create the definition of the rose petals. I started with a dot in the center and then created a bunch of parenthesis like shapes around the roses. I also outlined the roses a little thicker than the inside with this color. 

It'll look like this.

Next I basically did the same thing on the standin rose, just goin from top to bottom, criss crossin the lines. 

It'll look like this. 

With a medium green liner polish I made quick little leaves. The liner is Salon Perfect "Green Stem."

I also made a stem on the standin rose

and some leaves and thorns. 

I finished it off with a lime green liner (Salon Perfect "Spring") to add definition to all the leaves. Just a quick line and some quick flicks across the leaves. 

also add some to the stem and thorns.

The finished design will look like this! 

Finish up with your favorite top coat. I use Salon Perfect.

And that's it! 
Here's the video:


I know this is super girly for me, but I am really lovin it! It feels so dainty and beautiful! And it's helpin me love my new nubbins, while they grow back! This color is amazin and I know I'll be usin it a lot this summer!
If you'd like to participate in Recycle Mani Monday post your recycled mani on Mondays with the tag #RecycleManiMonday and every Tuesday I'll be featurin my favorites! 
If you get inspired by me use the tag #MagsyInspired on instagram so I can see!

Find Me Here Too:

~Maags 


Friday, June 12, 2015

Red & Black Watermarble

Hey Y'all!
I have a really fun, different watermarble for you today. 
I know when you look at it, it seems like a regular been done before marble, but it's different and fun for me because of the colors I used.
This was originally gonna be a red, black and silver marble but my silver did not want to cooperate in the water. So I had already had the silver painted on my nails as my base so I decided to use just the red and black. So I dunked my nails into the marble and when I pulled them out, I was in love. The red had sheered out just enough in the water that when it went onto the silver it turned a metallic red! I absolutely loved it and thought it was so fun that the colors had transformed each other! 


So Let's get into the tutorial:

I started with a silver base of Sephora Formula X "Need For Speed" and have my fingers taped for easier cleanup.

I start buildin my bullseye. I used Sephora Formula X "Dark Matter," black and Sephora Formula X "Flashy," red. 

This is my finished bullseye.

Then with a needle I draw from the center of the bullseye out to the edge of the cup on both sides (or top and bottom, however the cup is facin you)

Then I drag across the cup in a criss cross pattern to create the chevron like design.

It'll look somethin like this.

Then I line my nails up in the cup and dunk them into the design. I did two nails at a time for this one. 

With a qtip cleanup the whole surface of the water before pullin your nails out.

Slowly pull your nails out of the water and checkout your design.

Next remove your tape and cleanup any little bits of polish that may have gotten on the skin.

Finish up with your favorite top coat. I use Salon Perfect.

And that's it!
Here's the video:


I really love the way these turned out because of that mix with the red and silver. 
I hope y'all enjoyed these! 
I am wearin these right now to go see Rodman from Last Comic Standin! I'm so stoked he was my absolute favorite! He's so funny! If you don't know him go look him up he's fantastic! 
If you get inspired by me use the tag #MagsyInspired on instagram so I can see!

Find Me Here Too:

~Maags

Tuesday, June 9, 2015

Born Pretty Store Review/Demo: Nail Stickers

Hey Y'all!
I have another Born Pretty Review. Today I'll be reviewin some nail stickers.
These are sparkly yellow stickers. They come in a nice cardboard case and on a sheet like below with a clear plastic sheet on top. 
They're a little bit tacky on top and a real sticker on the bottom.
You just peel it off the paper 
and lay it down on the nail. It was pretty difficult to line it up perfectly, I had to keep peelin it back up off my nail to re-situate it. 
Then you are supposed to file off the excess at the tip. That was pretty easy to do, once you finally get it laid down right. 
I finished it off with a top coat. I use Salon Perfect. 

And that's it. 
If you wanna see how I did the yellow and black stamp it's in the first part of this video:


So overall I didn't really like these nail stickers. In the end they look pretty good, but they were so difficult to work with and one ripped really easily. I just wouldn't personally use these again. They might work better with shorter nails, but it was just a pain for me. 

Here's the link if you wish to purchase: 

I also have a 10% off code: ASQW10
I don't make money off this code.

Find Me Here Too:

~Maags 


Monday, June 8, 2015

Recycle Mani Monday: Abstract!

Hey Y'all! 
It's Recycle Mani Monday!
Time to change up those weekend mani's!
Here's Mine!


Here's How:
Startin with my previous manicure.

I'm takin a no name black polish and striper brush and makin two lines across my nail. One in the middle at an angle towards the tip and then one almost connectin with the first line down across the tip of my nail.

I repeat this with a lime green that I've mixed myself. You can use whatever green you have.

Repeat again with a neon pink. I used "East Austin" from Color Club.

Then with a dottin tool and a white polish I made random dots along the top of the first black line. I used Salon Perfect "Sugar Cube" for my white.

And also add dots between the first pink line and the 2nd black line.

Use your favorite top coat to seal it all in. I use Salon Perfect.

and that's it! 
Here's the video:


I hope y'all enjoyed this week's Recycle Mani Monday! 
If you wanna participate be sure to post your recycled mani to instagram with the tag #RecycleManiMonday and every tuesday I'll be featurin some of my favorites!

Find Me Here Too:

~Maags