Monday, June 8, 2015

Splatter Jelly Sandwich

Hey Y'all!
I have a splatter jelly sandwich! I haven't done one of these in about 2 years! My last one I think was with Lucero of Lovely_Nails. She had created this design and I had to recreate it and then we did bestie twin nails with it! I had completely forgot about it til I saw the picture a couple days ago! 


Here's How:

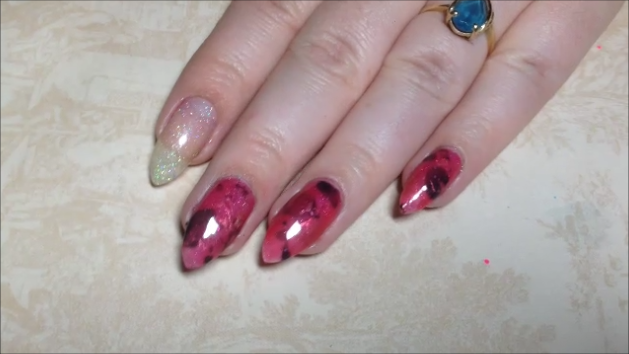
I started with a base of China Glaze Fairy Dust.

You'll need a straw like this, it's just one of those small coffee ones.

I'm startin by dippin my straw into a bottle of black polish. I chose to use Polish TBH "Ana" just because it has some fun glitters in it, you can use an all black polish if you don't have this.

Then I blew the polish through the straw onto my nail. 
There's no other way to say that, sorry buahahah!

Repeat with the next color, which is "Debutante" by Confetti. Dip the straw.

 and blow it onto the nail. You can do this as many times as you like until you get the desired amount of each color on the nail.

Then clean up with a small brush and acetone.

and to finish this off I'm goin to sandwich it all in with a jelly polish by JLB called "Coral Dream." You can use any jelly polish you have. Jelly polish just means that it's see through so you can see your design through the color.

I did two coats just to make that coral pop. 

Use your favorite top coat to seal it all in. I use Salon Perfect.

and that's it! 
Here's the video:


I loved doin these since I hadn't in so long! They always turn out so different and fun! 
If you get inspired by me use the tag #MagsyInspired on instagram so I can see!

Find Me Here Too:

~Maags


Thursday, June 4, 2015

Born Pretty Store Review/Demo: Skull Stamp

Hey Y'all!
I've got another stampin plate from Born Pretty Store to review! This one is a punk style and I'll be usin the skull design. 


Here's How:
I started with Zoya "Blaze"

The Plate I'm reviewin is BP-39 and the skull image. 

I started with a gold color, Confetti "Debutante" and placed it onto the plate.

Then with my creative shop scraper I scraped the polish towards me.

and pick up the image with my creative shop stamper in a rollin motion.

Line up your nail and push into the image.

and there it is on the nail.

 I use a piece of tape to clean the excess polish off my stamper.

Then I used black on the same image. I used Sephora Formula X "Dark Matter."

Did the same thing, put the polish on the plate, scrape the polish towards me and pick up the image in a rollin motion.

Line up your nail and push into the stamper. The black one went onto both my pinkies.

Use your favorite top coat to seal it all in. I use Salon Perfect.

and there it is!
Here's the video:


I hope y'all enjoyed this review and demo!
Checkout BornPrettyStore
and use the code: ASQW10 for 10% off 
(I don't make money off that code, it's just for y'all)

Find Me Here Too:

~Maags 

Neon Star Stamp

Hey Y'all!
I decided to join in on the nailartjune challenge on instagram and so I needed a neon design for the first day, which I'm late on but hopefully will catch up soon! I have been wantin to use Color Club "Hi-Tech Hibiscus" again, it's so beautiful, so I used it as my base color. And because I can't stop myself from usin Salon Perfect "Mer-Made Of Money," I used it for my stamp. Also Gol, I talked about this stampin plate in my monthly mani faves video and I was gonna link to a video I'd used it in and realized I hadn't done a video with it Gol, so I have now! 


Here's How:
I started with a base of Color Club "Hi-Tech Hibiscus"

I used this plate I got from etsy.

Also usin my creative shop stamper set.

I place the polish onto the stamp. I'm usin Salon Perfect "Mer-Made Of Money."

Then I scrape the polish towards me with my creative shop scraper.

Pick up the image with my stamper in a rollin motion. I know it's slightly hard to see the image because the colors are so light.

Line up your nail and push into the stamper.

And there's the image.

Clean your stamper with a piece of tape.

Use your favorite top coat to seal it all in. I use Salon Perfect.

And that's it!
Here's the video:


I hope y'all enjoyed this! I ended up really likin this despite the face that it was a random last minute decision. Also in person it's very hard to see the stars without good lightin so that's not my favorite but up close I like them gol.

Find Me Here Too:
Instagram

~Maags 

Monday, June 1, 2015

Recycle Mani Monday: Black French Tip

Hey Y'all!
It's Recycle Mani Monday! Time to jazz up those weekend mani's!
Here's Mine:


Here's What I Added:
I started with my previous stamp mani.
https://www.youtube.com/watch?v=rLYhkgVSdVY

Then with an unnamed black polish I painted a black stripe at an angle on the tip of the nail. We're goin to create a V shaped french tip. 

Then I repeated that on the other side so the two met at the point creatin the V. And that's it! Super Simple!

Use Your favorite top coat to seal it all in. I use Salon Perfect. 

All Done! 
Here's the video:


I hope y'all enjoyed this week's Recycle Mani Monday!
If you'd like to participate just post your recycled mani on instagram every Monday with the tag #recyclemanimonday and every Tuesday I'll be featurin some of my favorites!

Find Me Here Too:

~Maags