Showing posts with label pink nails. Show all posts

Sunday, February 7, 2016

Valentine's Day Layered Stamp

Hey y'all!
Today I have another Valentine's Day mani for ya! This one is a layered rose design. 

Here's how:
I started with a pink base of Color Club "Wicker Park." 

 This is the plate I'm usin from the bundle monster, with the rose design.

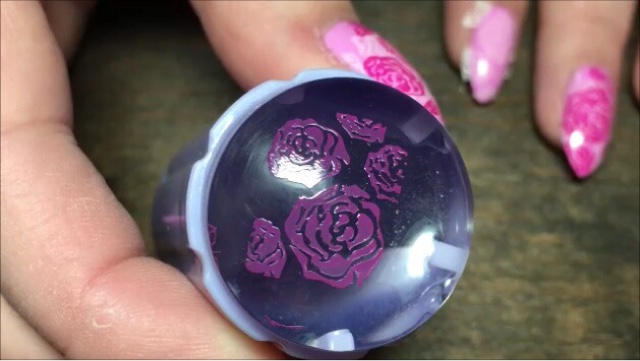
And my clear jelly stamper from the born pretty store.

Then usin a light pink (Sinful Colors "Easy Going"), I place it onto the image.

Then scrape the polish towards me.

And pick the image up with the stamper in a semi rolling motion.


Line it up over your nail and look down the center to help with placement.

That's what it'll look like.

Clean your stamper with a piece of tape.

Next use a darker pink (Sephora Formula X "Eureka") and place that onto the same image.

Scrape the polish towards you.

Pick up the image with your stamper.

Line it up over your nail and look down the center to help place these roses around the first roses. 

Use a small brush with acetone to clean up any excess polish on the skin.

Finish everythin off with your favorite top coat. I use Salon Perfect.

And that's it!
Watch the video tutorial here:http://youtu.be/FoLfm-fQSJk

Hope y'all enjoyed this! I absolutely loved the way these turned out! Definitely one of my favorite designs! 

If you get inspired by me use the tag #MagsyInspired on Instagram so I can see! 

Just a few more designs before Valentine's Day! 

See ya next time!
post signature

Tuesday, February 2, 2016

Sugar Spun Valentines

Hey Y'all! 
It's February! Time for Valentine's Day nails! 
I'm never sure how I'll feel about Valenetine's Day until it comes around. Last year was a tough one for me, I was dealin with a broken heart and it definitely showed in the designs I did haha. This year I've been online datin and even though it's been a little rough, it's still given me hope of true love so I'm trying to let that show through in my new designs. Hopefully you'll enjoy what I come up with. 

Today I have a sugar spun valentine design. 
I haven't done sugar spun in quite awhile so this was fun. It just reminded me of candy with the chocolate drizzles. 

Let's get into how: 
I started with a hot pink base of Salon Perfect "Wrapped Around My Pink-y"

I'm usin this plate from bundle monster with the hearts design. 

And my clear jelly stamper from the born pretty store. 

Start by placin a red polish onto the image. I used Salon Perfect "Salsa Dance."

Then I scrape the polish towards me. I'm usin my creative shop scraper because I don't like the scraper that comes with the stamper. 

Pick up the image with a slight rollin motion. 

There's the design on the stamper.

Line the stamper up over the nail and look down the center to help with placement and squish it down on the nail.

Clean your stamper with a piece of tape. 

On a piece of paper I let some white polish (Salon Perfect "Sugar Cube") sit and get sticky. Then usin a small dottin tool I drag into the polish and string it across my nail. 

It'll end up looking like this once you're done. 

Use a small brush with acetone to clean up any polish on the skin.

Finish everythin off with your favorite top coat.


I placed this napkin under my nails so I could try to show better color accuracy. The pink is so hard to capture on camera. It's even lighter still than this picture.

And that's it! 
Watch the video tutorial here: 

Hope y'all enjoyed this look! I'm off to figure out the next one! 
See ya next time!
post signature

Thursday, August 20, 2015

Pink Camo

Hey Y'all!
I know I have been neglecting my blog recently! My heart just wasn't in it for a bit. I have been so crazy busy up until now, it just took a back seat. But I'm hopin I'm back to it for awhile! 
Today I have a fun pink camo look for ya! I really love the way they turned out! It was a different take on it that I think worked for a fun look!

Here's How:
I started with a hot pink base color. "Tickled Pink" by Salon Perfect.

I used this stampin plate by Bundle Monster, to create the camo look. It's plate number 310 from the 2012 collection. 

I'm using a dark green color for the first stamp layer. Pure Ice "Internationally Known." Polish the image on the plate.

Then scrape the polish towards you using a scraper. I used my creative shop stamper set. 

Pick the image up with a rollin motion. 

Line up your nail with the image and press into the stamper. 

And there's the first layer of your camo. 

Always clean your stamper with a piece of tape to keep it in good condition.

Clean off your plate between colors with a cotton round and some acetone.

Repeat the process with your next color. I used a lighter green "Pistache," from Sinful Colors.
Paint the polish on the image.

Scrape the polish towards you.

Pick up the image with a rollin motion.

Line it it up with your nail and press into the stamper. Now you have two layers of your camo.
Clean off your plate and stamper for your next color.

Repeat this process one more time with your last color. I used a dark brown "Scandal," by Pure Ice.
Paint the polish on the image.

Scrape the polish towards you.

Pick up the image with your stamper in a rollin motion. 

Line it up with your nail and press your nail into the stamper. Now you have all 3 layers to your camo!

Use a small brush with acetone to clean up the excess polish on the skin.

Finish everythin off with your favorite top coat. I use Salon Perfect.

And that's it! 


I absolutely love these! I wish I could wear them longer! I have so many designs to get to right now, but I sure wouldn't mind wearin this design again someday! 
If you get inspired by me use the tag #MagsyInspired on instagram so I can see! 

Find Me Here Too:

~Maags