Showing posts with label nail lacquer. Show all posts

Thursday, August 20, 2015

Pink Camo

Hey Y'all!
I know I have been neglecting my blog recently! My heart just wasn't in it for a bit. I have been so crazy busy up until now, it just took a back seat. But I'm hopin I'm back to it for awhile! 
Today I have a fun pink camo look for ya! I really love the way they turned out! It was a different take on it that I think worked for a fun look!

Here's How:
I started with a hot pink base color. "Tickled Pink" by Salon Perfect.

I used this stampin plate by Bundle Monster, to create the camo look. It's plate number 310 from the 2012 collection. 

I'm using a dark green color for the first stamp layer. Pure Ice "Internationally Known." Polish the image on the plate.

Then scrape the polish towards you using a scraper. I used my creative shop stamper set. 

Pick the image up with a rollin motion. 

Line up your nail with the image and press into the stamper. 

And there's the first layer of your camo. 

Always clean your stamper with a piece of tape to keep it in good condition.

Clean off your plate between colors with a cotton round and some acetone.

Repeat the process with your next color. I used a lighter green "Pistache," from Sinful Colors.
Paint the polish on the image.

Scrape the polish towards you.

Pick up the image with a rollin motion.

Line it it up with your nail and press into the stamper. Now you have two layers of your camo.
Clean off your plate and stamper for your next color.

Repeat this process one more time with your last color. I used a dark brown "Scandal," by Pure Ice.
Paint the polish on the image.

Scrape the polish towards you.

Pick up the image with your stamper in a rollin motion. 

Line it up with your nail and press your nail into the stamper. Now you have all 3 layers to your camo!

Use a small brush with acetone to clean up the excess polish on the skin.

Finish everythin off with your favorite top coat. I use Salon Perfect.

And that's it! 


I absolutely love these! I wish I could wear them longer! I have so many designs to get to right now, but I sure wouldn't mind wearin this design again someday! 
If you get inspired by me use the tag #MagsyInspired on instagram so I can see! 

Find Me Here Too:

~Maags 


Thursday, June 18, 2015

Born Pretty Review: Lace Stickers

Hey Y'all!
Another Born Pretty Store review for ya! I had quite a few products this time so I wanted to get right through em!
Today we have some lace nail stickers. 

I was too in love with Orly Color Blast "Enchanted Rose" that I decided to use it as my base again! I like the look of the black with the pink. 

Here's the Review/Demo:
Here is what the stickers look like. Just a small sheet. 
Here's the link to purchase: 
10% off code: ASQW10

I used the skinny strips first and I cut them down to fit my nails. 

I just placed the sticker right onto my nail and pressed it down. These are super sticky so make sure you place them correctly because they don't come back up without messing up your base. 

I used scissors to cut the ends of the stickers off 

and curled them under my nails.

Then I used the bigger strips on my middle nails and thumbs. I place it on the sticker sheet like this so I don't touch the sticky side too much before placin it on my nail.

I placed it on my nail like this usin the sticker sheet as my guide

and cut it straight across to separate the strip.

Then cut the tips off like the rest of the nails

It was a little difficult to do this but I used my small brush and acetone to remove the excess sticker at the cuticle. I had to brush it quite roughly to get it come off. 

Then finished it all off with my top coat. I use Salon Perfect.

That's what it looks like up close. It took 3 coats of top coat before it would fully lay down and stay on my nail. 

And that's it!
Here's the video:


So overall I liked the look of these but again they were a pain to use. The small strips were much easier to use but they all still crinkled up on the sides. The tips never fully laid down, I had a couple nails peel up the next day. I really do like the look but they just aren't practical enough for me.

Find Me Here Too:

~Maags

Monday, June 15, 2015

Recycle Mani Monday: Belle

Hey Y'all!
Recycle Mani Monday here again!
I know this week isn't a traditional recycle mani, as I just had a swatch on, but I had to get rid of my weekend mani. I had had it on since Wednesday night and was sick of it! haha! 
But I still recycled the color so there ya go! 


First of all I love this color! It's Orly Color Blast "Enchanted Rose" from the new belle collection at walgreens! I wanted the whole collection, but mostly just for the names gol! None of the other colors were really that unique and I spose you could say this one isnt either, but to me it is! I absolutely love it! It's such a beautiful hot pink with opaly color shifty shimmer! And so of course I had to do roses on top to go with the name! 

Here's How:
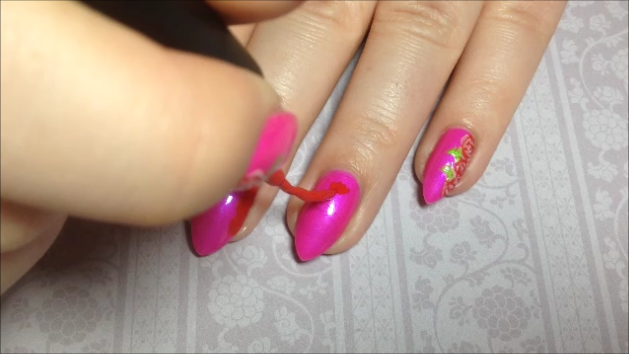
I started by usin a red liner polish to make rough circle shapes down the side of my nail. They don't need to be perfect circles. The liner I used is Salon Perfect "Laser Beam."

They'll look like this.

Then I decided to do a standin rose on the ring finger. I started making small lines at the top of the nail comin in from the sides to meet eachother in the middle. Little swoops kind of. 

It'll look somethin like this. 

Then I used a light pink polish (Salon Perfect "Pocketful of Posies) and a striper brush to create the definition of the rose petals. I started with a dot in the center and then created a bunch of parenthesis like shapes around the roses. I also outlined the roses a little thicker than the inside with this color. 

It'll look like this.

Next I basically did the same thing on the standin rose, just goin from top to bottom, criss crossin the lines. 

It'll look like this. 

With a medium green liner polish I made quick little leaves. The liner is Salon Perfect "Green Stem."

I also made a stem on the standin rose

and some leaves and thorns. 

I finished it off with a lime green liner (Salon Perfect "Spring") to add definition to all the leaves. Just a quick line and some quick flicks across the leaves. 

also add some to the stem and thorns.

The finished design will look like this! 

Finish up with your favorite top coat. I use Salon Perfect.

And that's it! 
Here's the video:


I know this is super girly for me, but I am really lovin it! It feels so dainty and beautiful! And it's helpin me love my new nubbins, while they grow back! This color is amazin and I know I'll be usin it a lot this summer!
If you'd like to participate in Recycle Mani Monday post your recycled mani on Mondays with the tag #RecycleManiMonday and every Tuesday I'll be featurin my favorites! 
If you get inspired by me use the tag #MagsyInspired on instagram so I can see!

Find Me Here Too:

~Maags