Showing posts with label floral nails. Show all posts

Sunday, February 7, 2016

Valentine's Day Layered Stamp

Hey y'all!
Today I have another Valentine's Day mani for ya! This one is a layered rose design. 

Here's how:
I started with a pink base of Color Club "Wicker Park." 

 This is the plate I'm usin from the bundle monster, with the rose design.

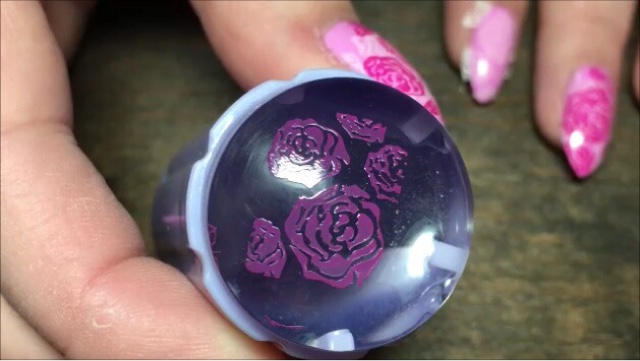
And my clear jelly stamper from the born pretty store.

Then usin a light pink (Sinful Colors "Easy Going"), I place it onto the image.

Then scrape the polish towards me.

And pick the image up with the stamper in a semi rolling motion.


Line it up over your nail and look down the center to help with placement.

That's what it'll look like.

Clean your stamper with a piece of tape.

Next use a darker pink (Sephora Formula X "Eureka") and place that onto the same image.

Scrape the polish towards you.

Pick up the image with your stamper.

Line it up over your nail and look down the center to help place these roses around the first roses. 

Use a small brush with acetone to clean up any excess polish on the skin.

Finish everythin off with your favorite top coat. I use Salon Perfect.

And that's it!
Watch the video tutorial here:http://youtu.be/FoLfm-fQSJk

Hope y'all enjoyed this! I absolutely loved the way these turned out! Definitely one of my favorite designs! 

If you get inspired by me use the tag #MagsyInspired on Instagram so I can see! 

Just a few more designs before Valentine's Day! 

See ya next time!
post signature

Thursday, July 16, 2015

Recycle Mani Monday: Floral

Hey Y'all!
Recycle Mani Monday!
Today I changed my cotton mani into a floral mani. 


Here's How:

I started with my previous cotton bud mani:

I used a dottin tool and a burgundy polish to cover up all the cotton buds and create the base of my flowers. The polish I used was Avon "Very Berry."

Then I went in with a striper brush and lighter pink polish and filled in the middle of the flowers. I used Avon "Parfait Pink."

I went back in with the striper brush and a little more of the berry color on top of the light pink just to add a bit more definition.

Then I quickly went in with a green striper brush (Salon Perfect "Green Stem,") to add a little greenery as leaves.

Here's a closer look at the final design.

Use your favorite top coat to seal it all in. I use Salon Perfect. 

And that's It!


I hope y'all enjoyed this one! I liked this manicure both ways!
If you'd like to participate in Recycle Mani Monday then post your recycled weekend mani's to the hashtag #RecycleManiMonday every Monday and Tuesday's I feature! 

Find Me Here Too:

~Maags 


Monday, May 18, 2015

Recycle Mani Monday: Grunge

Hey Y'all!
I have a fun new series I'm startin today, called "Recycle Mani Monday!"
Basically every Monday I'm goin to recycle my weekend manicure instead of startin over with a whole new design. So by recycle I mean I'm just goin to add onto my previous mani to create a new one. I thought it would be really fun to make it a new series for my youtube and instagram! 
So speakin of that, I'm makin it a hash tag as well! 
If you'd like to join in here's all you have to do:
Post your recycled mani to instagram every Monday
And hashtag it #RecycleManiMonday
Then every Tuesday I will feature some of my favorites from the hashtag! 

Here's my recycle for this week!


I went with a grunge graffiti look.


Here's How:
I started with my previous mani from Sunday. 

Then I took black acrylic paint and dabbed it onto a scrunched up piece of saran wrap. I dabbed some of the paint onto a paper towel to remove excess amounts.

Next just sponge it onto your nail.

This is how mine looked after the black. 

Then I recycled my saran wrap by turnin it inside out, so the black was inside now and I had a clean surface on the outside.

And I repeated the spongin with a blue acrylic paint.

I used my small brush and acetone to clean up any excess paint on the skin.

Use your favorite top coat to seal it all in. I use Salon Perfect.

And that's it! You have a brand new recycled mani in a matter of minutes!
Here's the video:


I hope y'all enjoyed this and that you'll participate for next week's Recycle Mani Monday! 
Don't forget to use the tag (#RecycleManiMonday) and follow me to see if you get featured on Tuesday!

Find Me Here Too:

~Maags

Sunday, May 17, 2015

Summer Floral Side French

Hey Y'all!
Today I have a fun, special post!
DenisseLove and I have teamed up to do some bestie twin nails with some of the polish we got at NailPro! It was so awesome to meet her and now so much fun to do a collab together! 
I fell in love with one of her recent mani's and so we based it off of that and added our own flares to it! We decided to use 2 Orly polishes that we both recieved! 


Here's how I did mine:
I started with a base of Orly "Push The Limit." 

Next I took that same color and painted it onto half of a makeup sponge and the other half, I added Orly "Fireball."

Then sponged it onto my nail to create this gradient. 

I use a qtip with acetone to clean up most of the polish on the skin. If you want to tape your fingers or use liquid latex go for it.

Then I use my small brush with acetone to make sure the cuticle area is cleaned up.

With a dottin tool and blue acrylic paint (Apple Barrel "Bright Blue") I made 3 circle-ish shapes for the base of the flowers, leavin room between each one. 

With a lighter blue (Salon Perfect "Cold as Ice") I filled in the spaces between the darker blue flowers. 

Then with a striper brush and a light green polish I painted small lines to represent leaves, wherever you would like.

The final step is to go in with a striper brush and black (Salon Perfect Liner "Black Ink") and outline the flowers and leaves fully. Then add little squiggly parenthesis like shapes inside the flower to give it petal definition. 

It'll look like this when you're done.

Use your favorite top coat to seal it all in. I use Salon Perfect.

And that's it! 
Here's the video: 


I hope y'all enjoyed this one! I absolutely love this design! It's so bright and colorful and I can't stop starin at it! So gorgeous! I'm so happy Denisse wanted to do this with me! Be sure to check out her instagram by clickin on her name at the top of this post. 
If ya get inspired by our design use the tag #MagsyInspired so we can see! 

Find Me Here Too:

~Maags