Thursday, February 12, 2015

Out Of This World Galaxies

Hey Y'all!
Today I have a super fun galaxy mani! This is the base art for my TNAG design for tomorrow! I know I won't be able to film the finished look for this but I really wanted to share the galaxy base with y'all! I love the way this turned out, so vibrant and super fun and easy! 

Here's how:
I started with a blue base and I wanted to make it more fun with holo! I used Color Club Halo Hues "Over The Moon." 

Here's a sun swatch just for fun! 

Then with a makeup sponge I'm just dabbin on some white polish to one side of the tip. I used Salon Perfect "Sugar Cube."

Then I sponged on the white in a diagonal line across the nail.

Next I took Pure Ice "Show Stopper" and dabbed it onto the other side of the sponge tip.

Then I sponged the yellow over the white. 

Next I covered the white side of the sponge with Pure Ice "French Love Affair." 

I sponge this over the bottom half of the yellow.

Then I ripped the top of the sponge off so I could continue usin the same sponge.

I dabbed on Color Club Holo Hues "Eternal Love."

and sponged it randomly around the nail.

On the other half of the sponge I dabbed on Zoya "Brooke."

and also sponged that randomly around the nail.

Then with a small dottin tool and white polish I placed random dots around the nail to represent stars.

To add even more sparkle, I topped it off with China Glaze "Fairy Dust." 

OOOOOOOHHHH! AAAAHHHHHH!

Then just to seal it all in and give it extra shine and smoothness, I added my favorite top coat, Salon Perfect.

And that's it! 
Here's the video:


I really really love the way these turned out! Even more so than any galaxy nail I've done! To be honest I never really fully liked any of my galaxy nails and I think it's because I've always used a black background. This time I wanted somethin different so I used the blue and I'm really pleased with the outcome! I'm also very excited for what is goin on top of this for tomorrow! If you wanna see make sure you follow me on Instagram!

If you get inspired by me use my tag #MagsyInspired so I can see! 

see ya tomorrow for TNAG!

Find Me Here Too:

~Maags


Wednesday, February 11, 2015

Dark Valentine Abstract

Hey Y'all!
I have another valentine design. This time it's a dark version of a design I did 2 years ago. 

Here's the original design:

Here's How:
Start with a red base. I used Zoya "Haley."

Usin a striper brush and black polish draw an outline of a heart on your nail. I used Salon Perfect "Oil Slick."

Then draw another smaller heart in the middle of the first heart and fill it in. 

Then add lines connectin the two hearts. Just randomly no real pattern.

With a dottin tool add in 3 black blobs across the lines, as a base for a rose design.

Then with the striper brush and grey create little c's or parenthesis designs in the blobs to create roses. I used Sinful Colors "My Turn" grey.

Use your favorite top coat to seal it all in. I use Salon Perfect. 

And that's it! I know this design was a little dark to film and photograph but I hope ya can get the gist of it. 
Here's the video:


Hope y'all enjoyed this Then&Now design. I'm glad this design was shown on two different nail shapes so y'all can see it can be done no matter what shape ya have. 

If ya get inspired by me use my tag #MagsyInspired on instagram so I can see!

Find Me Here Too:

~Maags 


Tuesday, February 10, 2015

Salon Perfect Brow Pomade

Hey Y'all!
Today I have a makeup review. Salon Perfect sent me some of their new brow products to test out and I've been testin them all week! They also sent me their new brow powder and stencil kit but I'll be doin a separate review on that since I want time to test it out as well. 
They come in these plastic boxes. Each one is separate, so you can pick your match or mix them all to get your perfect match! 

I got all 3 colors: blonde, light brown and dark brown.
Here's what the containers look like. 

and here's the pomade inside. Yes I've already been usin it for a week so sorry they're all dipped into. These are sooooooo creamy! I mean you really only need the smallest amount. I dipped my brush in and then wiped it around on the inside of the lids then used it on my eyebrows. The dark brown seems to be the creamiest of them all. I also really like the colors. They're all slightly darker on the eyebrow than they look in the container. The blonde is actually really nice, not too light even for my dark eyebrows.

These are the brushes each one comes with. They're dual ended. One side is an angled brush to apply the pomade with and the other side is a spoolie to blend everythin out. Sorry mine are dirty as I just used em. I think these are really good. It's easy to apply and you can use different angles on the brush to get the desired result you want. 

Here's a closer look at my eyebrows after application. This is an exaggerated view with the lightin, but you can see they're filled in very nicely and that's very little product. 

Here's a front view, looks a little better. I like to use the blonde at the front of my brow very lightly in an upward motion, towards my forehead. Then I use the light brown in the middle and the dark brown on the ends. Then I blend it all together with the spoolie end. 
I really like this a lot. Even more so than they're powder and wax kit I previously used. This is just so quick and easy to apply and so far for me it's lastin power is great. It usually lasts all day on me from 9am to 10pm or so. It doesn't budge. It can also look natural or it's buildable if you prefer stronger brows. These retail for $4.88 at walmart. 

Here's just a couple of selfies gol with my brows hahaha


Hope y'all enjoyed this and might wanna checkout this product now. 
I'll be back soon with the powder/stencil kit. 

Find Me Here Too:

~Maags 


Monday, February 9, 2015

Valentine Skittlette

Hey Y'all! 
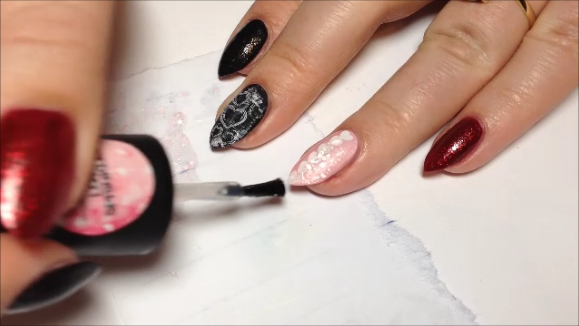
Today I have a Valentine skittlette mani for you. It's dark with a hint of lovey dovey, which surprised me since I wasn't goin to do this gol. 
I really like the way this turned out. I haven't done a skittlette in a long time. 
My middle nail is inspired by @Lacqueredmama She did a whole mani and it was amazin!
Mine didn't turn out as great as hers but I still love it. 

Here's how I got this look:
I started this mani with my middle finger in Sinful Colors "Whipped" matte black and my ring finger is Island Girl "Tropical Breeze." 

Then I took Salon Perfect "Sugar Cube" and wiped the brush almost completely off. 

And did the dry brush mani on the middle nail. Also painted my ring finger with Essence "Edward's Love." black from the Twilight collection, and my thumb and pinky in Salon Perfect "He's with Me." red. 

Then usin Sinful Colors "My Turn" matte grey

I did some more dry brush over the white. 


Next I used Bundle Monster plate 317 hearts.

I used the same white for the stamp

scrape the polish towards me with my creative shop scraper

and pick up the image with my stamper 

Then roll the stamp onto the nail over the dry brush.

and that's what it looks like. Chalkboardy hearts!

Then I used Sinful Colors "Love Sprinkles" glitter and pour some on a paper so I can get some heart glitters out. 

Then with a dottin tool I place the hearts in a line down the middle of the pink nail.

Next take the remainin glitter on the paper with the polish brush and apply it all over the nail.

Lastly I top coated all the nails except the middle.

Then I used a matte top coat from Salon Perfect on the middle nails.

and there ya go! 
Here's the video:


This one was a little hard to photograph with the dark and light colors mixed, but in person it looks great! I really love the chalkboard hearts! Jen's idea was fabulous! Be sure to checkout her page in the link I posted at the beginnin of this post! She's a great woman!

Hope y'all enjoyed this post, a little break from the complete darkness gol. 

Find Me Here Too:

~Maags